Showing posts with label D7000. Show all posts

Friday, February 3, 2012

Get a Grip!

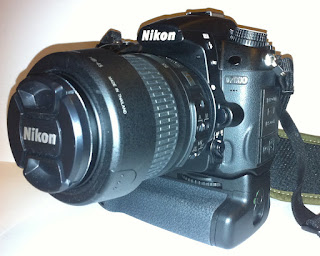
I bought a battery grip! 3rd party, as the original MB-D11 is priced too high locally. Nikon SG has a recommended retail price (RRP) of S$334! I wouldn't pay this amount for a grip that does nothing more than hold extra batteries and allows you to hold the camera in portrait orientation. Yes, it is tough and weather sealed. So?

Seriously, this thing only acts as a grip. Unless it adds GPS functionality or increases the performance of the camera (FPS), I don't see a point spending so much money on it. It simply doesn't justify the hefty price tag. I can get a fairly good compact camera or a good tripod with this amount!

Back to the post. My intention is to introduce the grip that I bought. It's made by Hercules Accessories, distributed locally by SGCameraStore. Usually priced at S$120, I got it during the CNY (Chinese New Year) sale at a price of S$68! Yes, it's S$68.00!

There are quite a number of 3rd party grips in the market, so what made me choose the Hercules?
1) Price --> The CNY offer was simply irresistible!
2) Dials directions --> It's been reported that 3rd party grips are all dialing in the opposite direction. However, thru a fellow forumer, it is reported that the Hercules grip does not have this issue, thus I took the plunge! This is the actual reason I bought the grip.

Note: I bought this grip on 19th Jan 2012, but didn't have time to test/play with it til the 28th. While field testing, I found some issues with the grip. On the 30th, SGCameraStore did a 1 to 1 exchange for the faulty unit I had. Read on as I review the grips --> GripS as the 2 I had my hands on were slightly different.

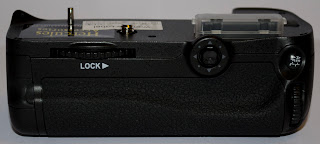
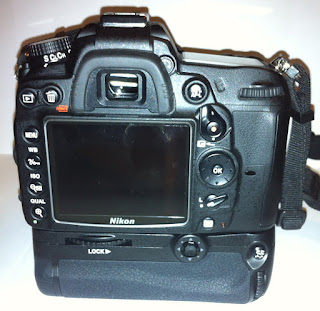
First impressions: Build quality of the grip is good. It does not feel like cheap plastic. Instead, it feels really solid. The rubbery area feels slightly different from the camera, but it's not cheap rubber either. The lock nut does not move freely after you attach the grip to the camera, unlike the fake Nikon MB-D11's which had the lock nut running wild even after the grip was attached.

From the looks of the logo, I kind of  expected their packaging to be something like Nikon's, but hey, surprise! It wasn't what I was expecting!
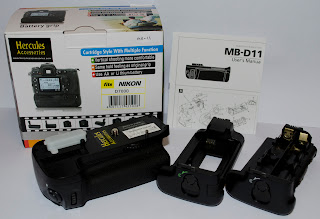
The Box and Contents (V1)
As of the time of posting, Hercules website is longer available. I do remember it used to be there. I wonder what happened?

So, what was the issue I mentioned earlier? I believe it's either a bad connector or the circuit board was faulty. The grip was able to function properly initially when connected to my camera. I could check battery info, turn the dials, and all buttons responded properly. However, I noted that the front dial was turning in the reverse direction! The main dial was working alright.

I didn't notice the failure only until halfway thru my outing. I was happily shooting away until I had time to rest and wanted to check the battery info. It was then that I realized the grip was not functioning properly. The camera couldn't sense the battery in the grip. I tried removing and re-attaching the grip, making sure the connector was in place, and that nothing was in the way but that did not help at all. The shutter button kept responding so I thought it might be a battery compartment issue. However, after further testing, I realized the dials were not responding too. It was already past the 3 days one to one exchange period so I was rather horrified! There was nothing I can do at the moment in time so I just had to wait.

Luckily, on the 30th, after making an enquiry call to SGCameraStore, I was advised by Melvin (store manager or owner?) to bring the grip and my camera along. They told me they will do a one to one exchange, and that my camera will be used to test the replacement unit they will be giving me. The exchange went smoothly, no further questions asked (after our phone conversation), and I tested the replacement set on the spot. I noticed slight differences in the grips but that will have to wait til I review the new unit.

I had taken pictures of the 1st unit when I got it but did not have time to complete this posting. And with the 2nd unit, I'm now able to make a 'side by side' comparison of the 2 grips. Let's call them V1 and V2 for simplicity's sake. V1 will refer to the faulty unit while V2 will be the unit I am currently holding.

1st difference (cosmetic) - Multi-directional pad's color, rubber grip's texture:
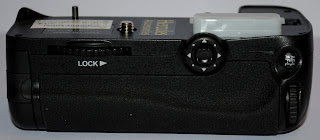
V1
V2

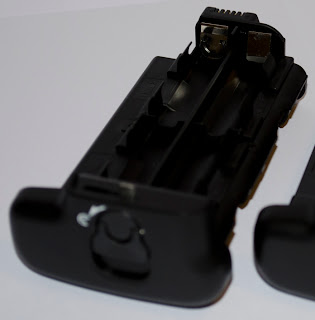
2nd difference (cosmetic) - EN-EL15 Battery Tray:
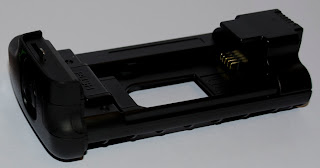
V1 - with 'PUSH' written
V2 - 'PUSH' is missing

3rd difference - AA Battery Tray Connector material:
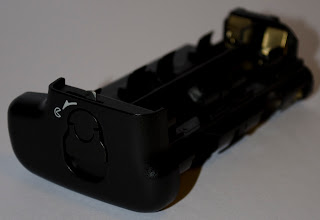
V1 - Copper connectors
V2 - Shiny connectors (I don't know what you call this material)

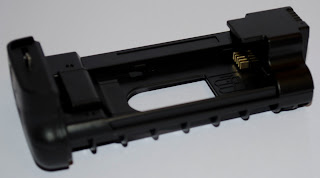
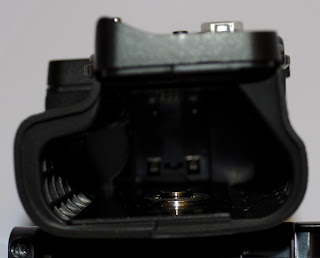
4th difference - metal piece inside the grip has changed:
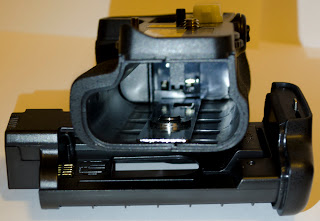
V1 - Slim Metal Base
V2 - Broad Black Metal Base

5th difference: This is the MOST important difference! The front dial is actually working in the correct direction! I believe this is a newer batch of grips from Hercules that has rectified the dials issue. Boy, am I glad that V1 failed! Now with V2, I've got a completely great grip that works just like the original!

And the below pictures shows how the grip looks on the camera. Note: Pictures are taken with an iPhone under poor lighting, thus the IQ is not that great!
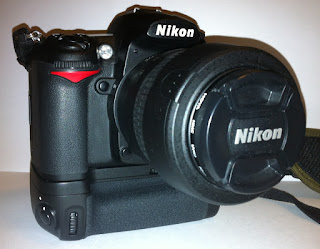
Front view - Right
 
Front View - Left
 
Back

I hope you've enjoyed this introduction + review of the grip like I did posting it.

I'm in love with the grip. The camera feels so much better with it on! I won't be leaving home without it anytime now!

Sunday, November 13, 2011

Some important updates

Seems like I'm turning this into a monthly (or more) blog.
Family life has been top priority for the past months. Been spending more time with my daughter after she went back to school. OK, let's get things going.

Important updates you should know of!

1) Firmware updates (v1.01 & v1.03) for Nikon D5100 and D7000. For those who have been plagued by the memory card problems (mostly Sandisk cards), Nikon has finally released an update to resolve the issue. Note: Whether it resolves or not, I'm not sure. I don't own the D5100 and I don't have this problem on my D7000.

2) ViewNX 2 updated to version 2.2.3
This is the basic software that comes with your DSLR to view and edit your photos. For home users who are not using other advanced software, please update your version for the bug fixes. (I realized mine was version 2.0.2!!!)

3) Updated NEF codec support (v1.12.0).
Thanks to the Nikon 1 series cameras, NEF got updated again. This time, it works for D7000 NEF files as well! What this does is: it enables your windows explorer to view NEF files directly. If you do not have this installed, the pictures you have taken will only appear as the NEF icon in thumbnail view. With this codec, windows explorer will display your pictures like JPEGs. Advantages: You can finally sort / delete your NEF files directly from windows explorer. I'm gonna do some housekeeping after this to remove all the random shots I took (NEF files are huge and take up tons of space!).

Wednesday, April 20, 2011

Ask and you shall be given!

Armed with my D7000, I've been taking quite a lot of pictures for my wife and girl. And my wife was telling me the other day: "It's time to get an iPad or a digital photo frame, our girl will definitely love it!"

Ask and you shall be given!

I was going through the forums searching for iPhone accessories and chanced upon quite a few folks selling brand new digital photo frames! Happened that these people have just received the Sony DPF-A710 from the Standard Chartered Bank's credit card promotion and are trying to sell them off. I managed to get one of it at S$55, while the normal retail price is S$129. Lucky us!

Sony DPF-A710
The unit I got was brand new and the box had no signs of being opened. It was all factory fresh! It even came with 12+3 months warranty (online registration) by Sony! Nice buy I would say! ;D

The contents
The frame came with a remote control, manual, CD-Rom, power adapter and stand. It cannot be powered by battery, which is something I'm wasn't hoping for since it will be placed near my TV. The stand fits on the right bottom corner at the back and the frame can be placed in portrait or landscape orientation.

Frame in action!
You can see the frame in action in the picture above. We display our family portraits rather than these random shots I took. We love the frame 'cos we are able to have a single display that shows all our pictures but the frame does have it's pro's and con's.

Pro's:
- Nice size --> Doesn't occupy too much space
- Remote controlled
- Good variety --> The frame allows you to display a variety of information: single picture or slide show/clock/calendar/picture with calendar or clock/multiple pictures in a frame etc.
- LCD brightness can be adjusted (the above is set at brightness 2 out of 10)
- Auto on / off timer
- Auto rotate images
- Supports SD / MMC / Memory Stick

Con's:
- Not able to select folder to display. It just reads all images in the memory cards and displays them.
- Resolution: The display is not really high quality so you'll be able to see some pixelation in some photos.

Improvements I'll like to see:
- Ability to select folder to display. This will really allow a user to make full use of the frame. We can sort our pictures into Portrait or Landscape folders and display them in the correct orientation. This will definitely increase the user experience!
- More time choices in between pictures. Currently for slide shows, I'm displaying them at 7secs interval. The next lower allowable interval is 3 secs. I think this is too short. If we can custom set the time interval, it will really be nice!

Overall I give this frame a 7 out of 10. -2 points 'cos of the resolution, -1 'cos I cannot select folders to display. Imagine you put in a 2Gb card full of pictures from different events --> it will be really tedious trying to find the set of pictures you want to display! If the pictures are separated into folders and we can choose the folder to display, it definitely will make everyone happier!

I hope someone from Sony sees this post and work out something for this frame! I will really be thrilled if they tell me the frame's firmware can be upgraded! =D

Friday, April 8, 2011

My Screen Protectors arrived!

The AC٠MAXX Screen protector arrived in 10 days after I bought them off ebay. I was thinking it may take a little longer but it was a pleasant surprise! Just in time before we took our trip! ;D

I've got mail!
The package came as shown above. Contents were protected by bubble-wrapped envelope.

The Package
As you can see above, there are 2 pieces of LCD protector. One is the for main LCD and the smaller piece is for the top LCD panel. These are made to fit specific DSLRs. Do not order the wrong one!

Back of the packaging
On the back of the packaging are the instructions on how to put the protector on.

My D7000 in it's original condition
Although my D7000 already came with a screen protector (BM-11), I just can't bare to use it. The BM-11 is made of plastic and I just feel that it will get damaged / scratched too easily.

Top LCD Panel
Here's a picture of the top LCD panel before I put on the screen protector.

Screen protectors applied!
Wa La! Screen protectors in place! You can easily identify the screen protector as they come with a silver frame. Still don't see it? Here's more!


See the silver frame around the top LCD? It wasn't there previously!
And below: you see it around the main LCD panel.


I'm really glad I bought these protectors. Now I'll have no worries drawing my D7000 out of my backpack! They also do not hinder the LCD's display since they are made of glass. I still see pictures clearly from my LCD without any color distortion. The best part is: they do not stick totally onto the camera. Only the border comes with some sort of adhesive to hold the protector in place and it does it very well! I don't find the protector moving around.

If you are interested in purchasing these, their website is here

Arrival of my dry cabinet!

Went back to my wife's kampong over the weekend to pray to her grandmother for 'Qing Ming', thus no blogs were posted. It was a fruitful weekend --> my wife was finally relieved of a burden and I too am really happy seeing her so relieved!

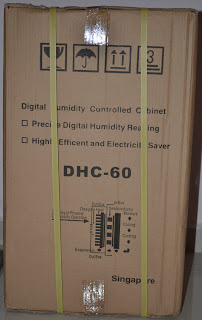
Just before we left, my dry cabinet arrived! Hurray!!! My lenses finally have a safe place to hide in! I got it for S$240 from Parisilk including free delivery.

Digi-Cabi DHC-60L
Back of box
As you can see, the cabinet came in a carton box. The contents were well protected with stuffing both at the top and bottom. There was also a small piece of stuffing in between the box to prevent any impact during transportation. My apologies for not having pictures of the stuffing within. I actually forgot to take them! =p

Unpacked Cabinet
The unpacked cabinet. More stuffing on the trays to prevent them from hitting the glass door during transportation. Manual and form paddings were already placed properly in the cabinet.

Drawers Extended
Here you see the drawers which are not fully extended. They are made of plastic but do not feel flimsy at all (even after I put up my gear)! The cabinet comes with 2 keys which are not featured here. The drawers are stopped by a catch when fully extended. You will not be able to pull it out unless you lift them up to a certain angle. This certainly is a welcomed feature as you won't have to worry about your camera or lenses dropping off if you pull too hard!

Back of cabinet
Back of the cabinet where the dehumidifier and power point is.

Internal Indicators
The internal indicator. Red LED at the bottom represents power while the Green LED at the top indicates the box is working to lower the RH to your desired level.

Digital Control (RH == Relative Humidity)
The digital control is in front and outside of the cabinet. It is powered by the same power supply for the cabinet, not like the AD series where this controller is powered by a 'AAA' battery. To set the RH, you press 'Set', followed by the arrows keys. The blue led lights up as well (with the Green LED) when the cabinet is working to lower the RH. You know it has reached the desired RH when the light goes off. The temperature is only an indicator, you won't be able to adjust this.

NOTE: if you set RH to 47%, the box will start to lower the RH when it reaches 49% and it will bring it down to 45% before it cuts off. It works based on ±2% RH.

I chose a digital dry cabinet 'cos I'm lazy --> I don't want to be fiddling around with an analogue dial to adjust the cabinet to the desired RH. I just want to set it and forget it. Another good point is that the digital cabinet is 'greener' than the analogue. It cuts itself off when the desired RH is reached. Unlike the analogue version where it works continuously to maintain the RH.

I hope this post clears the air for a lot of potential dry cabinet users who like me, are unable to find clear information / instructions online -- even from the manufacturers websites!

UPDATE (18-Sep-11): I 'upgraded' the Dry Cabinet. Take a look here.

Wednesday, March 30, 2011

My setup

Here's an introduction to my first set of DSLR:
The package
Package Contents: Nikon D7000 body, Nikkor prime 50mm f1.8D lens, Nikkor standard zoom 18-55mm VR lens, Nikkor telephoto 55-200mm VR lens, SB-700 flash gun, ML-L3 infra-red remote trigger, EN-EL15 spare battery, Tokina CPL filter x 1, Hoya multi-coated UV filter x 3 (1 for each lens)

I got the whole package from Parisilk via a 'group buy'. Some of the lenses were cheaper with the purchase with purchase we negotiated. Overall, I saved a few hundred bucks off standard retail price!


Freebies!
Freebies: Nikon SL168 tripod, Kingston 8Gb Class 6 SD card, Nikon card reader, Nikon bag, 3" LCD screen protector, cheap set of cleaning kit

Basically, the only useful items are the card, reader and bag. Please DO NOT use the tripod on your expensive equipment. It's better to get a more expensive and sturdy tripod!


The basic 'Must have' items
Lenspen LP-1 (S$18, Parisilk)
Lenspen is a wonderful invention! One end is a retractable brush and the other is a lens / filter cleaning tip that is made of a special compound that will 'never dry up'. I got this for $18 from Parisilk. I think you can get better prices if you source for them. It's a must have item in your bag wherever you go! You can quickly clean away dust and stains on your lenses wherever you are!


Standard Cleaning Kit (S$7, FairPrice Xtra Jurong Point)
Next important thing you should have is a cleaning kit. The blower is a must have to blow away large dust particles before you clean your lenses with a microfiber cloth. The set featured above has all the items you need. I got it real cheap ($7 as you can see) from FairPrice Xtra Jurong Point. I was quoted $15 for the same thing at Parisilk. Bring the blower with you when traveling. The lenspen + blower + microfiber cloth combo is good enough for cleaning your equipment on the move!


Tokina CPL (Circular Polarizing) Filter (S$28, Parisilk)
This is a must have item in my list. It basically reduces glare from water / glass surfaces. It's similar to other filters but there is an additional ring for you to turn to manipulate the light entering the lens. Notice that it's not clear glass? Here's a great guide you should read! It helped me understand filters and what I need. I'll post some pictures I took with this filter for comparison later.

Hoya Multi-coated UV Filter [HMC UV(C) grade] (S$16, Parisilk)
UV filters: I fit one of these over all my lenses for protection rather than UV reduction (read the guide to understand more). This is an added protection for your lens in case you knock them into some sharp items. It's so much easier and cheaper to replace compared to your lenses. Some people argue that this extra piece of glass creates glare / ghosting in your pictures. I say this is not true for most cases. If you find it happening, just unscrew it off your lens and take your pictures. It's just so convenient!

That's the end of my introduction! I've still got some gear not documented (haven't taken the pictures yet) but they will appear in later posts once I'm ready. By the way: I'm not affiliated with Parisilk in any way. They just happen to offer the best prices for most of the items I need, that's why I keep mentioning them.

Tuesday, March 29, 2011

Wow!

Wow! Didn't realize it's been more than a year since I created this blog!

I just bought my first DSLR (Nikon D7000) recently and I want to share the knowledge I've acquired. I'll be posting a lot of stuff related to photography from now on.

Armed with my new camera, there will definitely be more interesting stuff posted!
I need to get started learning how to use my camera. So much to learn, so little time.
Cya now!